Microsoft Dynamics 365 Business Central sync setup guide
This guide will walk you through setting up the sync with Microsoft Dynamics 365 Business Central (MSDBC). We sync with the cloud version of Microsoft Dynamics 365 Business Central, not the on-premise version or international version.
Jump to:
- Permission requirements
- Install the BILL app for MSDBC
- Initiate historic transactions
- Set up accounting preferences in Cashflow360
- Connect the sync
- Prepare your GL settings
- Select sync preferences
- Dimensions in MSDBC
Permission requirements
To install the BILL app from the Microsoft Dynamics 365 Business Central Marketplace and connect the sync, the MSDBC user must be in the Business Premium or Business Full Access User Groups, and will need the SUPER permission in Microsoft Dynamics 365 Business Central. The sync will not connect without these permissions.
Verify permissions in Microsoft Dynamics 365 Business Central:
- Select the magnifying glass.
- Search for Users.
- Select Users.
- Select the user that will be performing either actions, and check permissions:
- Under User Groups, they'll need to be in the Business Premium or Business Full Access User Groups.
- Under User Permission Sets, they'll need the SUPER permission set.
Install the BILL app for MSDBC
The app will:
- Add additional fields to the entities that we will sync.
- Automate web services.
- Add a BILL payment method.
Install the app:
- Select Setup & Extensions in Microsoft Business Central.
- Select Extensions.
- Select Manage.
- Select Extension Marketplace.
- Enter BILL in the search bar.
- Select Get it now for the BILL Accounts Payable Automation app.
- Enter any missing profile information if prompted, then select the checkbox to give Microsoft permission to share your account information and agree to their terms of use and privacy policy, and select Continue.
- Select Install.
- Select Ok.
- Close the Extension Installation box and the Extension Marketplace.
- Refresh the Setup & Extensions page until you see the BILL app installed, about 5-10 minutes.
Do not attempt to connect the sync yet. You must Initiate historic transactions before you connect the sync. If you accidentally connect the sync before initiating historic transactions, please contact Customer Support.
You can check the status of the install in by following these steps in:
- Select Setup & Extensions in Microsoft Business Central.
- Select Extensions.
- Select Manage.
- Select Deployment Status.
Initiate historic transactions
Initiate historic transactions in Microsoft Business Central to allow your data to sync to BILL.
IMPORTANT: Do not skip this step and do not connect the sync until this is complete. If you accidentally connect the sync before initiating historic transactions, please contact Customer Support.
In Microsoft Business Central:
- Select the question mark.
- Select Help & Support.
- Select Inspect pages and data under Troubleshooting.
- Select the magnifying glass in the top navigation bar.
- Search for BILL Setup.
- Select BILL Setup.
- If Initiate Historic Transactions isn't set to Yes (to the right), toggle it on.
- You can verify what it’s set to in the Page Inspection section
- Under Actions, select Initiate Historic Transactions.
Set up accounting preferences in Cashflow360
- Select Settings.
- Select Preferences under Accounting.
- Select edit.
- Enable any applicable settings:
- Show Account Numbers
- Books Closed Date
- Use Departments
- Use Locations
- Use Classes
- Use Jobs
- Show Company Name in Customer Dropdown
- Can be set to your preference as it won't affect the sync setup.
- Payment Term Preference on Bills
- Use Employees
- Use Items in Payables
- Vendor/Customer Sequence Id
- Set to auto-numbering if you have vendor and customer sequencing on in MSDBC.
- If you set to auto-numbering, we'll assign Vendor ID sequence numbers starting at 50000. You won't be able to assign a vendor ID number that's lower than 50000.
- If you select manual, a manually entered vendor ID is required for vendors to sync.
- Vendor ID Sequence Number: will only appear if Vendor / Customer Sequence ID is set to auto-numbering.
- Vendor numbers for vendors created in BILL will start with BDC (i.e. BDC-50000).
- Customer ID Sequence Number: will only appear if Vendor / Customer Sequence ID is set to auto-numbering.
- Customer numbers for customers created in BILL will start with BDCust (i.e. BDCust-50000).
- Show Chart of Accounts on Bill and Invoice Items
- Show GL Posting Date on Bills and Invoices
- Select Save.
Connect the sync
Be sure you have Initiated historic transactions before you connect the sync with the steps below. If you accidentally connect the sync before initiating historic transactions, please contact Customer Support.
Setup Microsoft Entra Application in Microsoft Business Central
For Cashflow360 to sync with your Microsoft Business Central company, you need to create an Microsoft Entra Application Application Record. If you have set up your sync already, one may already exist. If it already exists, validate you have the correct permission settings before proceeding.
Steps to take in Microsoft Business Central:
- Select the Magnifying Glass
- Search for Microsoft Entra Application
- Note: Users on the latest version of Business Central will see “Microsoft Entra Application“. Users with previous versions of Business Central will see the old naming “Azure Active Directory Applications“.
- Select + New
- Enter the client id: f59ad1a2-d9da-4598-b5ba-2962495b8488
- Change the state to Enabled
- Enter a description BILL Sync, which will create a user with the same name
- Add the following User Groups: D365 BUS PREMIUM and D365 AUTOMATION
- Add the User Permission set: BILL
- If you are setting up multiple companies, make sure to leave the Company Name field blank
- Microsoft Business Central should automatically add these permission set: D365 AUTOMATION, D365 BUS PREMIUM, LOCAL. If you do not see them, add them manually.
- Example Microsoft Entra Application for the BILL Sync:
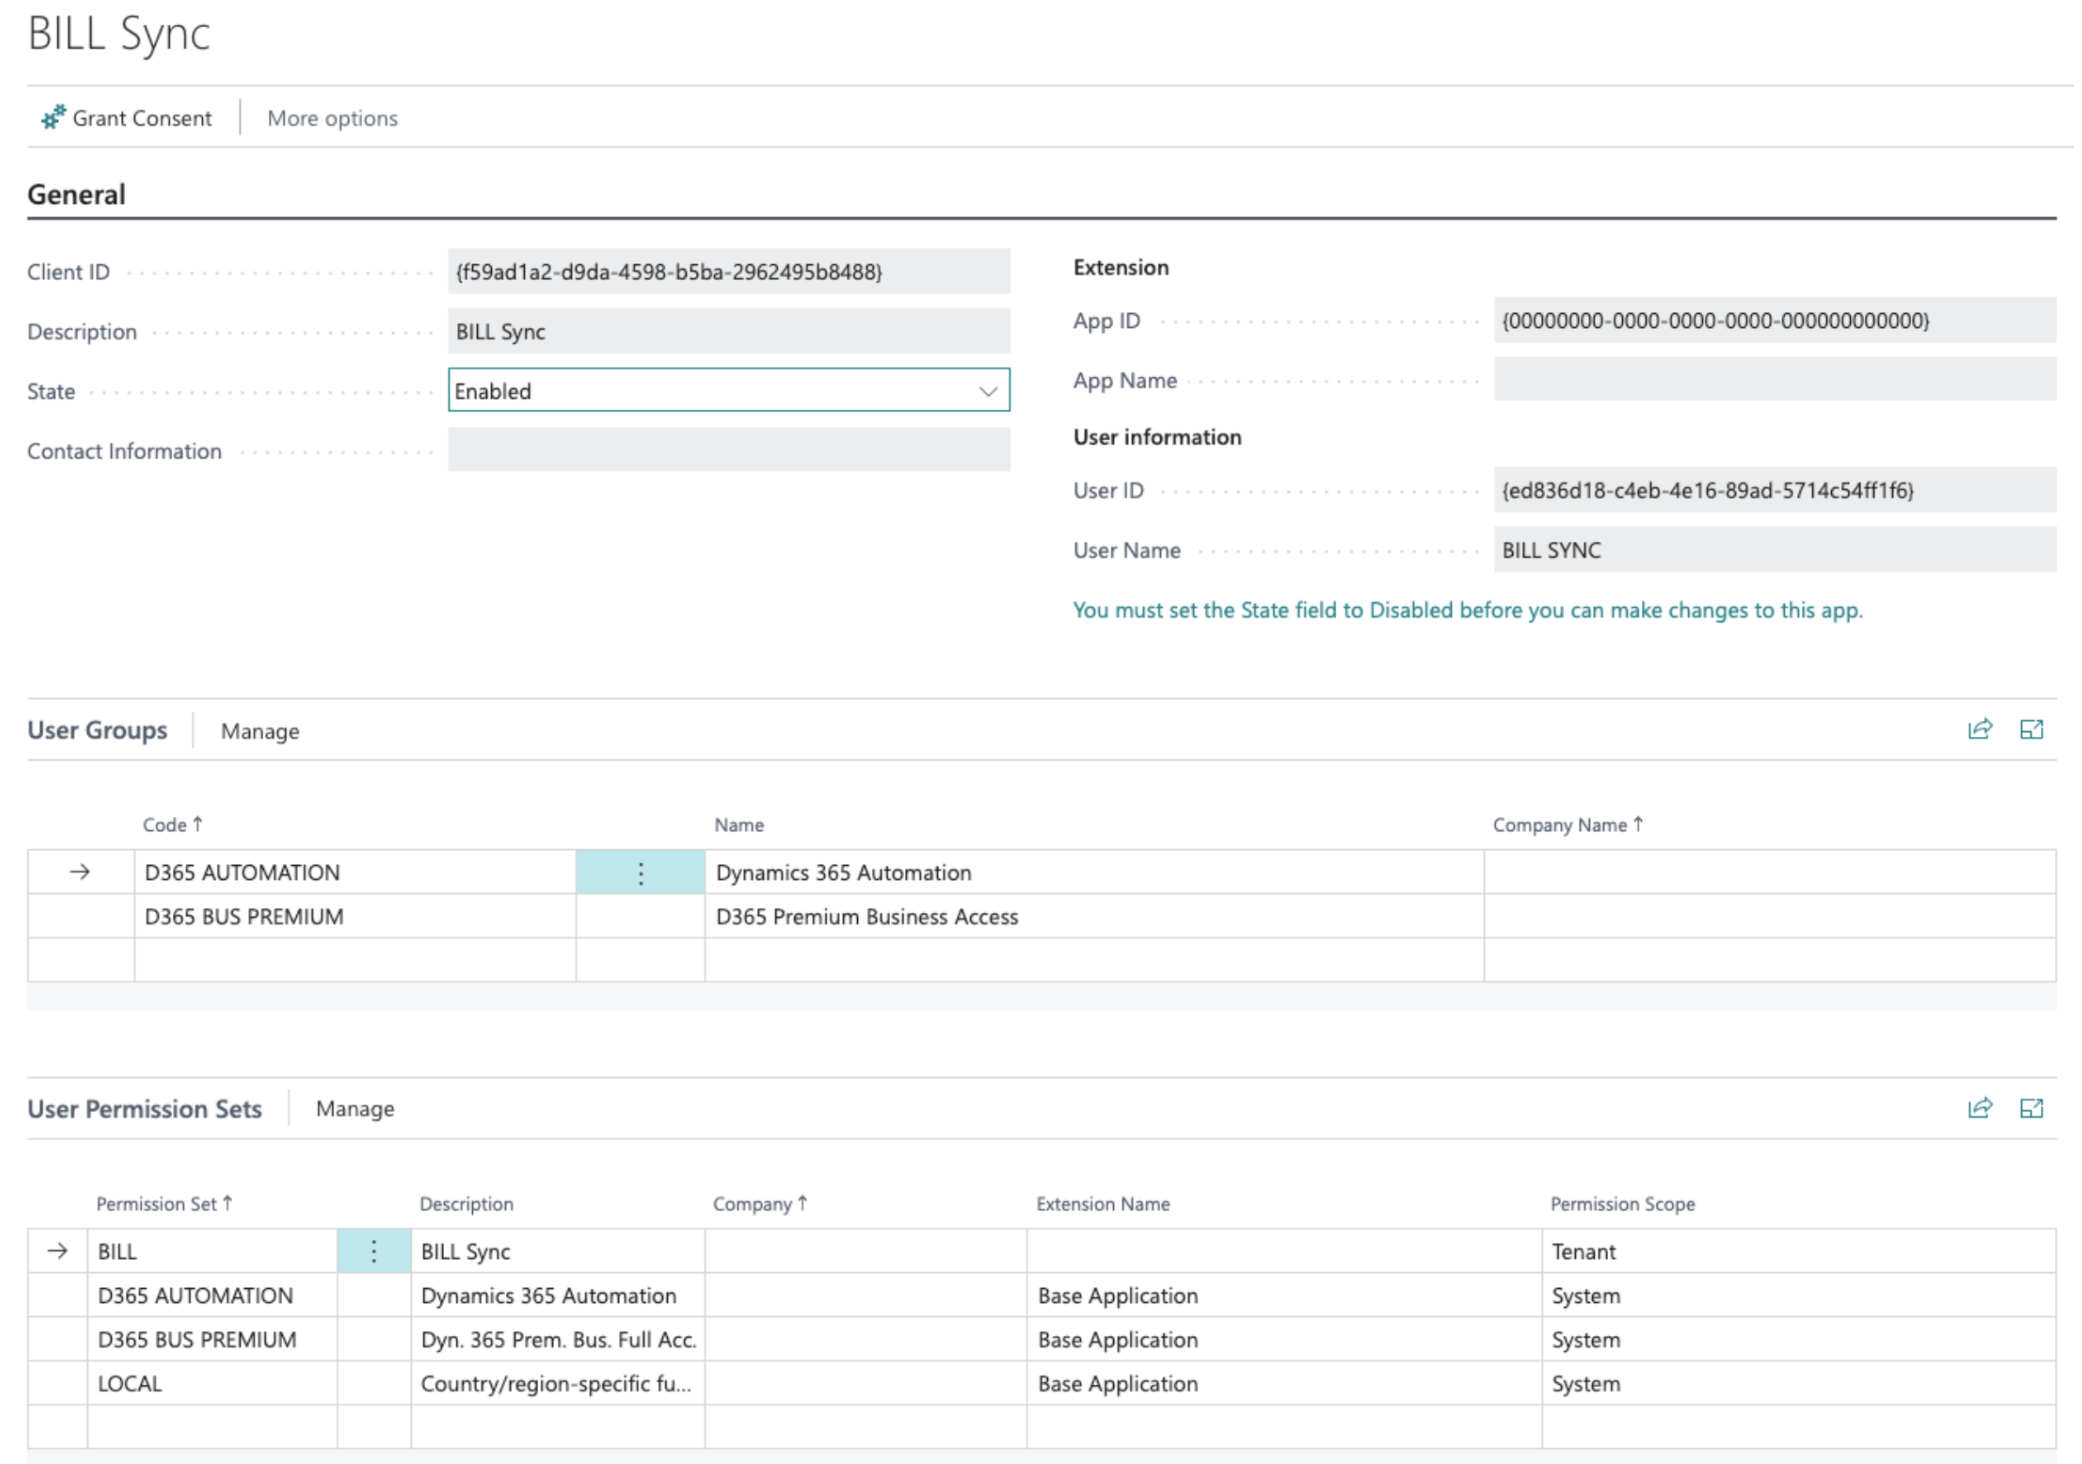
- Select Grant consent, (wait for the pop-up or scroll down and it should be at the Top Left), and select Accept

Set up your Microsoft Business Central sync in Cashflow360
Once you've completed the Microsoft Entra Application, you can connect the sync in BILL.
- Select Settings.
- Select Setup under Sync.
- Select Connect
Set up the connection variables:
-
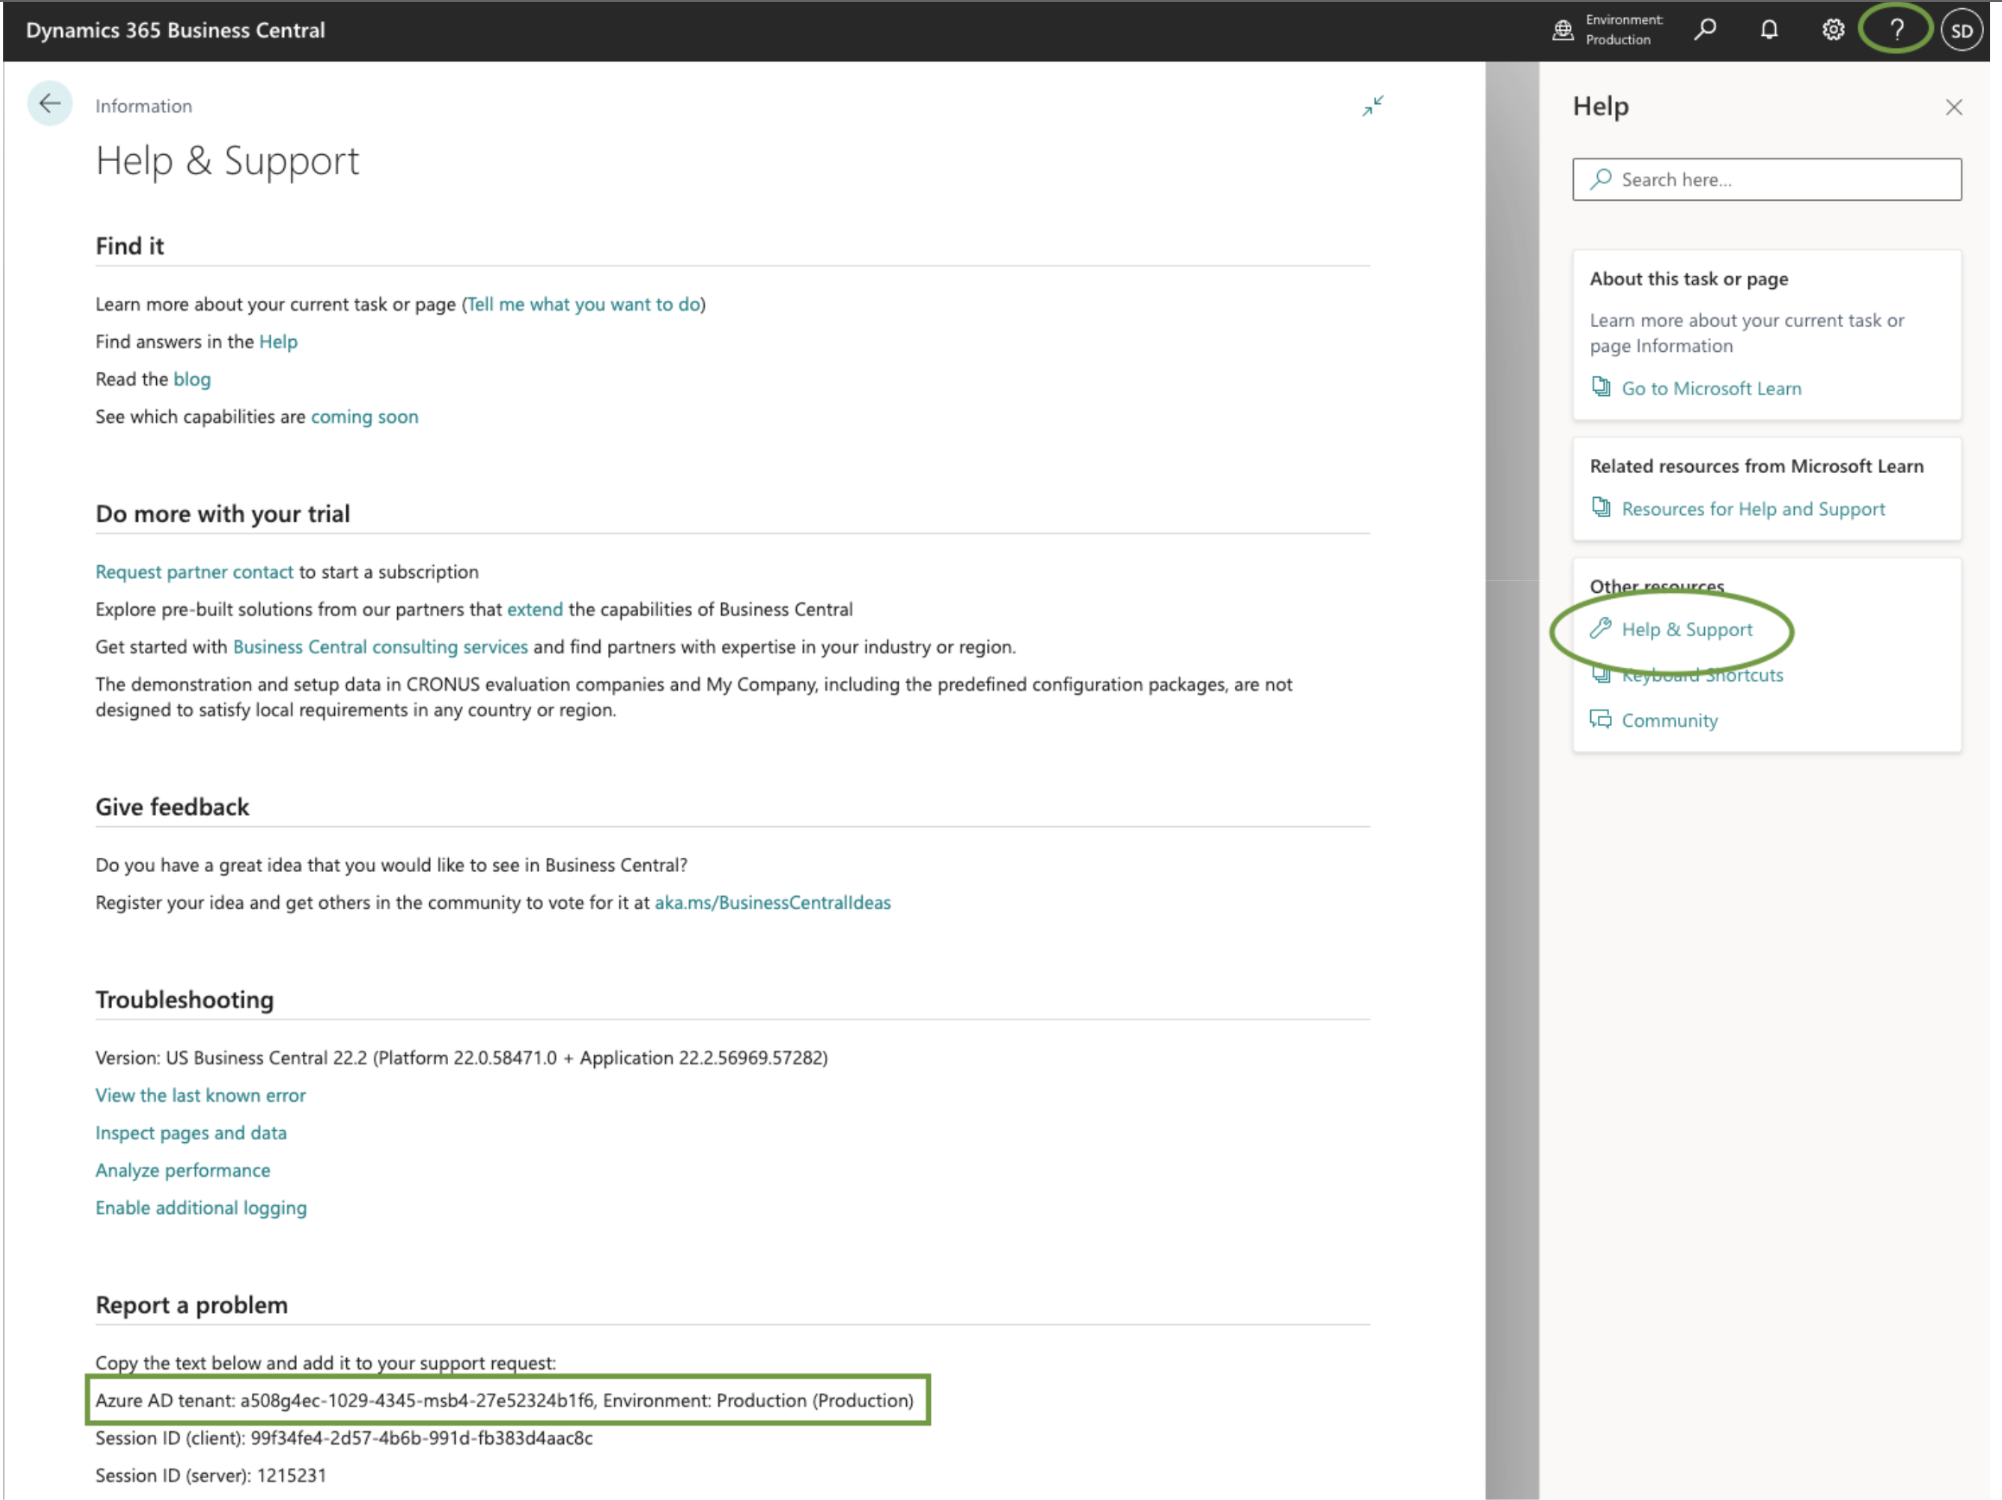
AZURE AD TENANT: a508g4ec-1029-4345-msb4-27e52324b1f6
- Login to Microsoft Business Central, login to the company you are connecting to BILL and get the Azure AD Tenant value from the URL in your browser.
- Example Value: “a508g4ec-1029-4345-msb4-27e52324b1f6”
- Example URL: https://businesscentral.dynamics.com/a508g4ec-1029-4345-msb4-27e52324b1f6/Production/
-
AZURE ENVIRONMENT: Production
- Login to Microsoft Business Central, login to the company you are connecting to BILL and get the Azure Environment value from the URL in your browser.
- In most cases the value will be “Production” for production accounts and “Sandbox” for sandbox accounts
- Example URL: https://businesscentral.dynamics.com/a508g4ec-1029-4345-msb4-27e52324b1f6/Production/
- If you cannot retrieve these values from the URL in your browser, select the help icon (“?”) in the top right corner of your Microsoft Business Central screen and click “Help & Support” in the “Other resources” section.
-
COMPANY NAME: BILLSyncExample

- Within Microsoft Business Central, search for Companies
- Retrieve the Name value.
- DO NOT use the Display Name
- Once you have the correct variables setup in the Sync Login page, select Save
- Your sync is now connected to your Microsoft Business Central account


Prepare your GL settings
To make sure transactions sync properly, there are a few things to complete in your GL settings.
Payment accounts
Update your payment GL accounts to Bank account type in Cashflow360 so they can be used for payments and sync preferences:
- Select Settings.
- Select Chart of Accounts under Accounting.
- Select the cash GL account for your bank account - your Cash account will sync over as an Other Asset account.
- Select edit
- Update Type to Bank
- This won't update the GL in Microsoft Dynamics Business Central
- Select Save
- Repeat for all accounts you'd like to use for payments
Any time you add a new bank account in MSDBC, you’ll need to change the type to Bank in Cashflow360 before you can use it for payments.
Transaction Journals
Create the following new journals in Microsoft Dynamics Business Central so you can track Cashflow360 payments separately:
- Payment Journal
- Select the magnifying glass.
- Search for Payment Journals.
- Select Payment Journals.
- Enter name BDC_PJ.
- Cash Receipt Journal
- Select the magnifying glass.
- Search for Cash Receipt Journals.
- Select Cash Receipt Journals.
- Enter name BDC_CRJ.
- General Journal
- Select the magnifying glass.
- Search for General Journals.
- Select Payment Journals.
- Enter name BDC_GJ.
You'll select these new journals when you complete sync preferences in the next section.
Select Sync Preferences
Select your sync preferences to be sure transactions and records sync the way you want. Make sure dimensions are enabled in Microsoft Dynamics Business Central
Select sync preferences:
- Select Settings.
- Select Preferences under Sync.
- Select edit.
- Assign the default accounts/locations you'd like to use for the following settings:
- Sync Automatically: Checking this box ensures that the sync is run at least once daily. However, the sync can always be run more often manually via the Sync Now button.
-
Unallocated Expenses Account: If an expense account isn't specified on a bill, the account selected for this preference will serve as a catch-all in your accounting system, where you know to look for bills that need to be coded. Common accounts used include Ask my Accountant, Miscellaneous, Uncategorized Expense, or Other Expense.
- Accepted account types: Expense, Other Expense
-
Default Bank Account: When you mark a bill as paid outside of Cashflow360, this preference serves as the default payment account.
- Accepted account type: Bank
-
Deposit To Account: This preference sets the default account for posting credit card and offline payments received in the accounting system. It's recommended that you select the Undeposited Funds account here so that payments are automatically grouped together in one account and available to be deposited in the future.
- Accepted account types: Bank, Other Current Asset
-
Vendor Posting Group: Enter the name of the Microsoft Dynamics Business Central vendor posting group that corresponds with the GL account you'd like Cashflow360 transactions to post to.
- We can only sync to one vendor posting group.
-
General Business Posting Group (Payables): Enter the name of the Microsoft Dynamics Business Central general business posting group that you'd like vendors created in Cashflow360 to sync to in Microsoft Dynamics Business Central.
- All vendors in Microsoft Dynamics Business Central regardless of posting group will sync to Cashflow360.
- All vendors created in Cashflow360 will sync to this selected posting group in Microsoft Dynamics Business Central.
- You can change their posting group in Microsoft Dynamics Business Central once they've synced over. Edits to these vendors in Cashflow360 won't update the posting group.
-
Customer Posting Group: Enter the name of the Microsoft Dynamics Business Central customer posting group that corresponds with the GL account you'd like Cashflow360 transactions to post to.
- We can only sync to one customer posting group.
-
General Business Posting Group (Receivables): Enter the name of the Microsoft Dynamics Business Central general business posting group for Receivables that you'd like customers created in Cashflow360 to sync to in Microsoft Dynamics Business Central.
- All customers created in Microsoft Dynamics Business Central regardless of posting group will sync to Cashflow360.
- All customers created in Cashflow360 will sync to this selected posting group in Microsoft Dynamics Business Central.
- You can change their posting group in Microsoft Dynamics Business Central once they've synced over. Edits to these customers in Cashflow360 won't update the posting group.
-
Dimensions: To find Dimensions in Microsoft Dynamics Business Central, select the magnifying glass > search for General Ledger Setup > scroll to Dimensions section. Must be a Shortcut Dimension Code, can’t be a Global Dimension. Enter the exact name of the dimension from MSDGP.
For example, based on the sample image below, for the Department Dimension preference in Cashflow360, you would enter Shortcut Dimension 1 exactly for that sync preference in Cashflow360. Shortcut Dimension 3 would be for Employee Dimension, and so on.
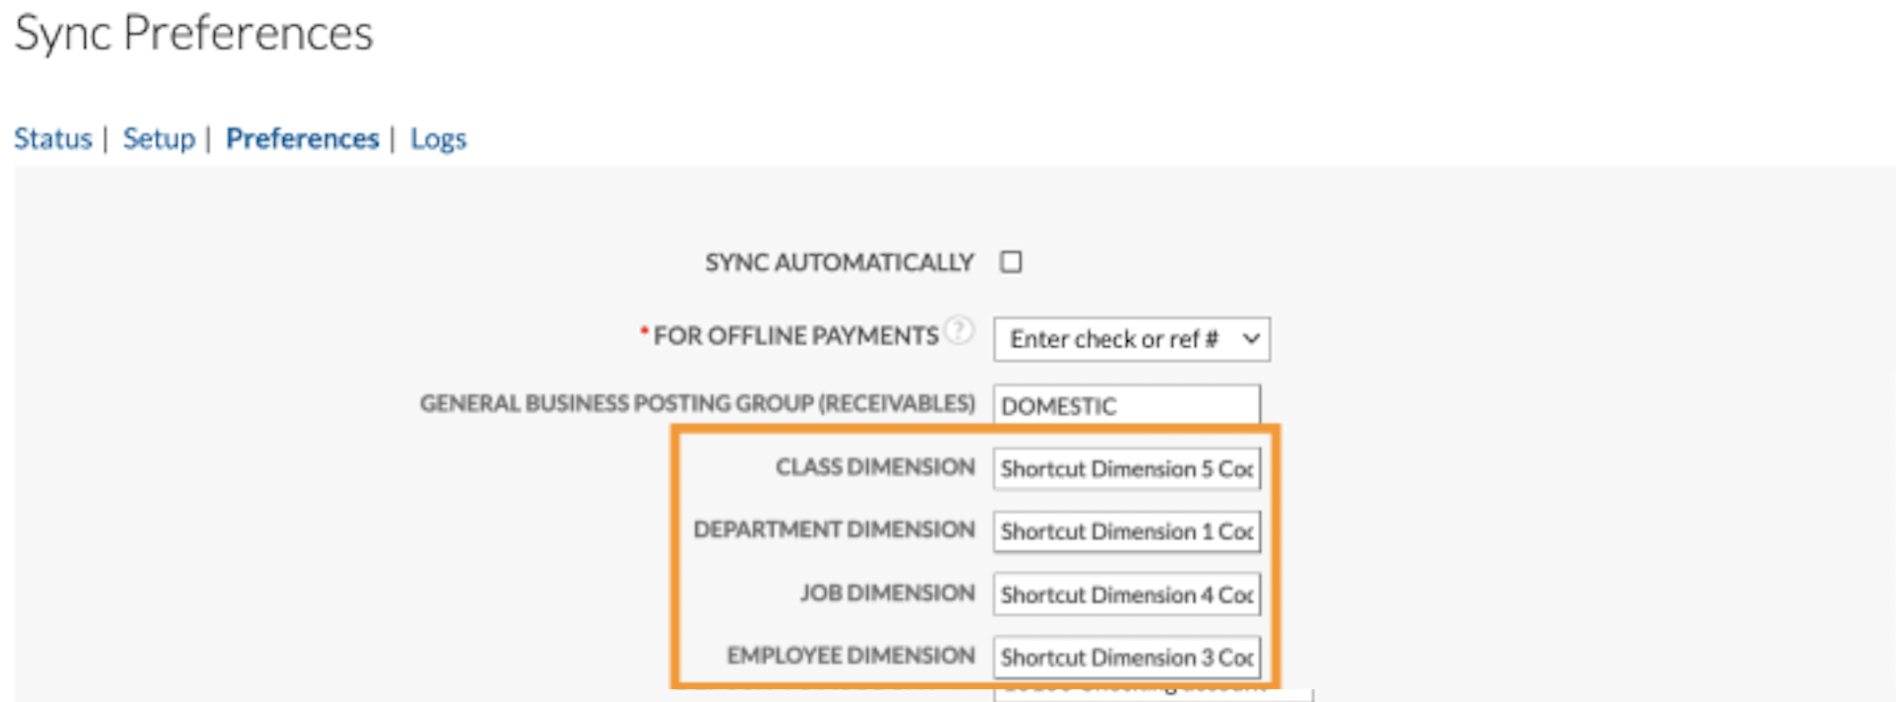
- Class Dimension: Enter the shortcut dimension code for the Microsoft Dynamics Business Central dimension you want to sync to the Class field in Cashflow360.
- Department Dimension: Enter the shortcut dimension code for the Microsoft Dynamics Business Central dimension you want to sync to the Department field in Cashflow360.
- Job Dimension: Enter the shortcut dimension code for the Microsoft Dynamics Business Central dimension you want to sync to the Job field in Cashflow360.
- Employee Dimension: Enter the shortcut dimension code for the Microsoft Dynamics Business Central dimension you want to sync to the Employee field in Cashflow360.
-
Payment Journal Name (Payables): Enter the name of the payment journal for Cashflow360 Payables payments to sync to.
- To view Payment Journal name in Microsoft Dynamics Business Central, select the magnifying glass > search for Payment Journals > the Batch Name is the Payment Journal Name.
-
Cash Receipt Journal (Receivables): Enter the name of the payment journal for Cashflow360 Receivables payments to sync to.
- To view Cash Receipt Journal name in Microsoft Dynamics Business Central select the magnifying glass > search for Cash Receipt Journals > the Batch Name is the Cash Receipt Journal Name.
-
General Journal Name: Enter the name of the general journal for Cashflow360 funds transfers to sync to.
- To view General Journal name in Microsoft Dynamics Business Central, select the magnifying glass > search for General Journals > the Batch Name is the General Journal Name.
-
GL Account for Bank Account XXXX: Select the GL account associated with the bank account listed in the preference name.
- Accepted account type: Bank
-
Master in case of conflict: These settings depend on workflow.
- Make Microsoft Dynamics Business Central the default for all: AP/AR workflow is managed in Microsoft Dynamics Business Central.
- Make Cashflow360 the master: AP/AR workflow is managed in Cashflow360.
- For vendors and customers, best practice is to keep MSDBC as the master so vendor and customer IDs sync properly.
- Not sure? Keep the defaults.
- These settings can be updated anytime.
- Select Save.
- Select Sync, then Sync Now.


Dimensions in MSDBC
To find Dimensions, in Microsoft Dynamics 365 Business Central:
- Select the magnifying glass.
- Search for General Ledger Setup.
- Select General Ledger Setup.
- Scroll to Dimensions section.
To view values under a Dimension list:
- Select the magnifying glass.
- Search for Dimensions.
- Select Dimensions.
- Select the box to left of the Code that you'd like to see the values for.
- Select Dimension.
- Select Dimension Values.
ACCOUNT SETUP View all